

Posted by Tinkr Tools
on August 19, 2026

A first apartment wall can look finished, or it can look like a waiting room. The difference is rarely the art. It is height, spacing, and whether you planned the arrangement before you put anything in the wall.
This is how to hang a gallery wall that reads as designed, works in a rental, and does not turn move-out into a conversation about holes.
You do not need a matching catalog set. You do not need a stud finder for most frames. You do need a tape measure, a level, and a half hour of layout work that happens on paper first.
Who this is for: a rental, a first place, a wall above a sofa or down a hallway. You want pictures up. You also want the deposit back.
What you’ll need
Time: 60–90 minutes for a wall of 5–9 frames, plus an hour of wait time if you use adhesive strips.
Skill: First-time friendly. The hard part is the layout, not the hammer.
Tools and materials
- Frames with hanging hardware already attached (sawtooth, D-rings, or wire)
- Kraft paper, butcher paper, or newspaper, plus scissors
- Painter’s tape
- Pencil
- Tape measure
- Level (a compact bubble level is enough)
- Hammer
- Hanging hardware rated for each frame’s weight: picture hooks, small nails, or adhesive strips
- Isopropyl rubbing alcohol and a clean cloth (for adhesive strips)
- Optional: a cardboard scrap cut 2–3 inches wide, used as a spacer
- Optional: a stud finder, if anything is heavy enough to hurt someone if it falls
- Optional: lightweight spackle and leftover wall paint, for later
You can gather these as singles. What we put in one kit is a claw hammer, a compact level, and a 93-piece set of nails, hooks, and hangers (the TINKR Hanging Kit).
Before you start
- Read the lease. Some buildings allow small nails. Some ask for adhesive only. Some treat a few nail holes as normal wear. The paper is the rule.
- Photograph the empty wall in daylight, straight on. Date the photos.
- Weigh the heavy pieces, or check the frame label. Glass adds more than people expect.
Plan the layout (paper first, wall second)
Do not hang the first frame and “build around it” by eye. That is how you get a crooked row and extra holes.
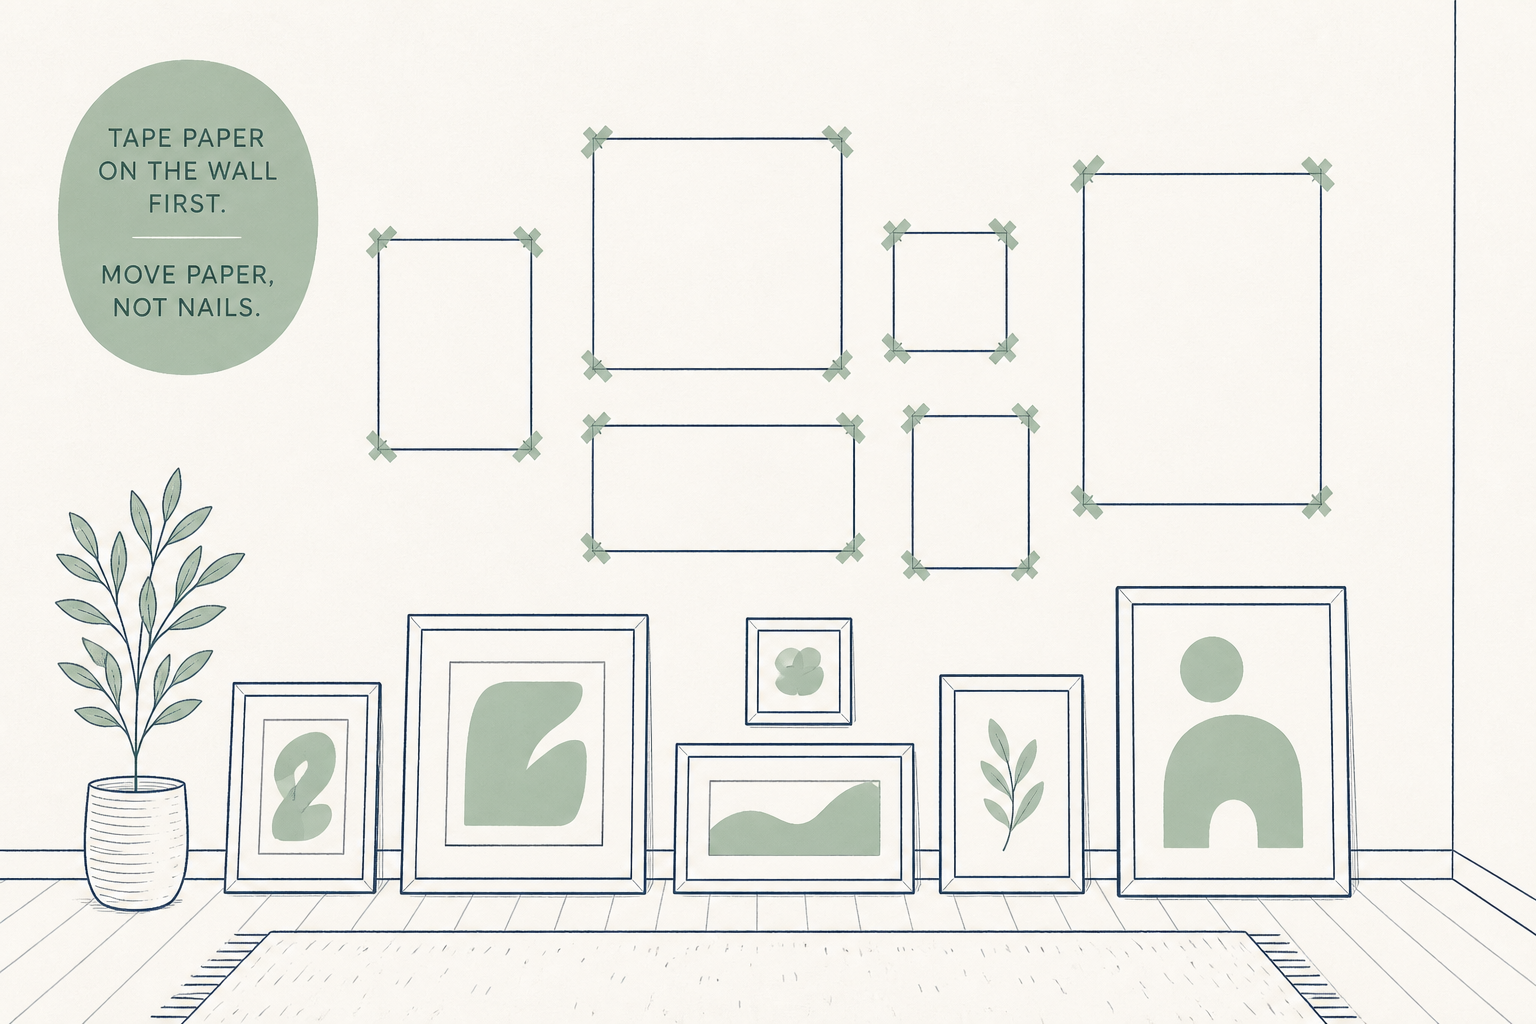
Step 1. Lay every frame on the floor in front of the wall. Treat the group as one object.
Step 2. Pick an anchor: the largest piece, or the one with the most visual weight. Place it slightly off-center unless you are doing a strict grid.
Step 3. Build out from the anchor. Mix two or three sizes. Keep one finish family if you can — all wood, all black, all warm metal. Mixed metals work when there is a plan. Random finishes read as leftover.
Step 4. Trace each frame onto kraft paper or newspaper. Cut the shapes out.
Step 5. On the back of each frame, measure from the top edge down to the real hanging point. For a sawtooth, that is the slot. For D-rings, the line between the rings. For wire, pull it taut and measure to the peak. Mark that same point on the paper, down from the top edge. Label each template so you do not mix them up.
Step 6. Tape the templates on the wall with painter’s tape. Sit on the sofa. Walk in from the door. Move paper, not nails.
Notes that save a wall: a tight cluster of mixed sizes looks collected. A same-size grid works when the frames match and the art is related; it reads like a dentist’s office when the prints do not. Keep 2–3 inches between frames. Above a sofa, stay about two-thirds the sofa’s width, and no wider than the sofa. Five good pieces beat nine fillers.
Height and spacing rules
Two numbers do most of the work. Use them, then break them on purpose.
The 57-inch center line
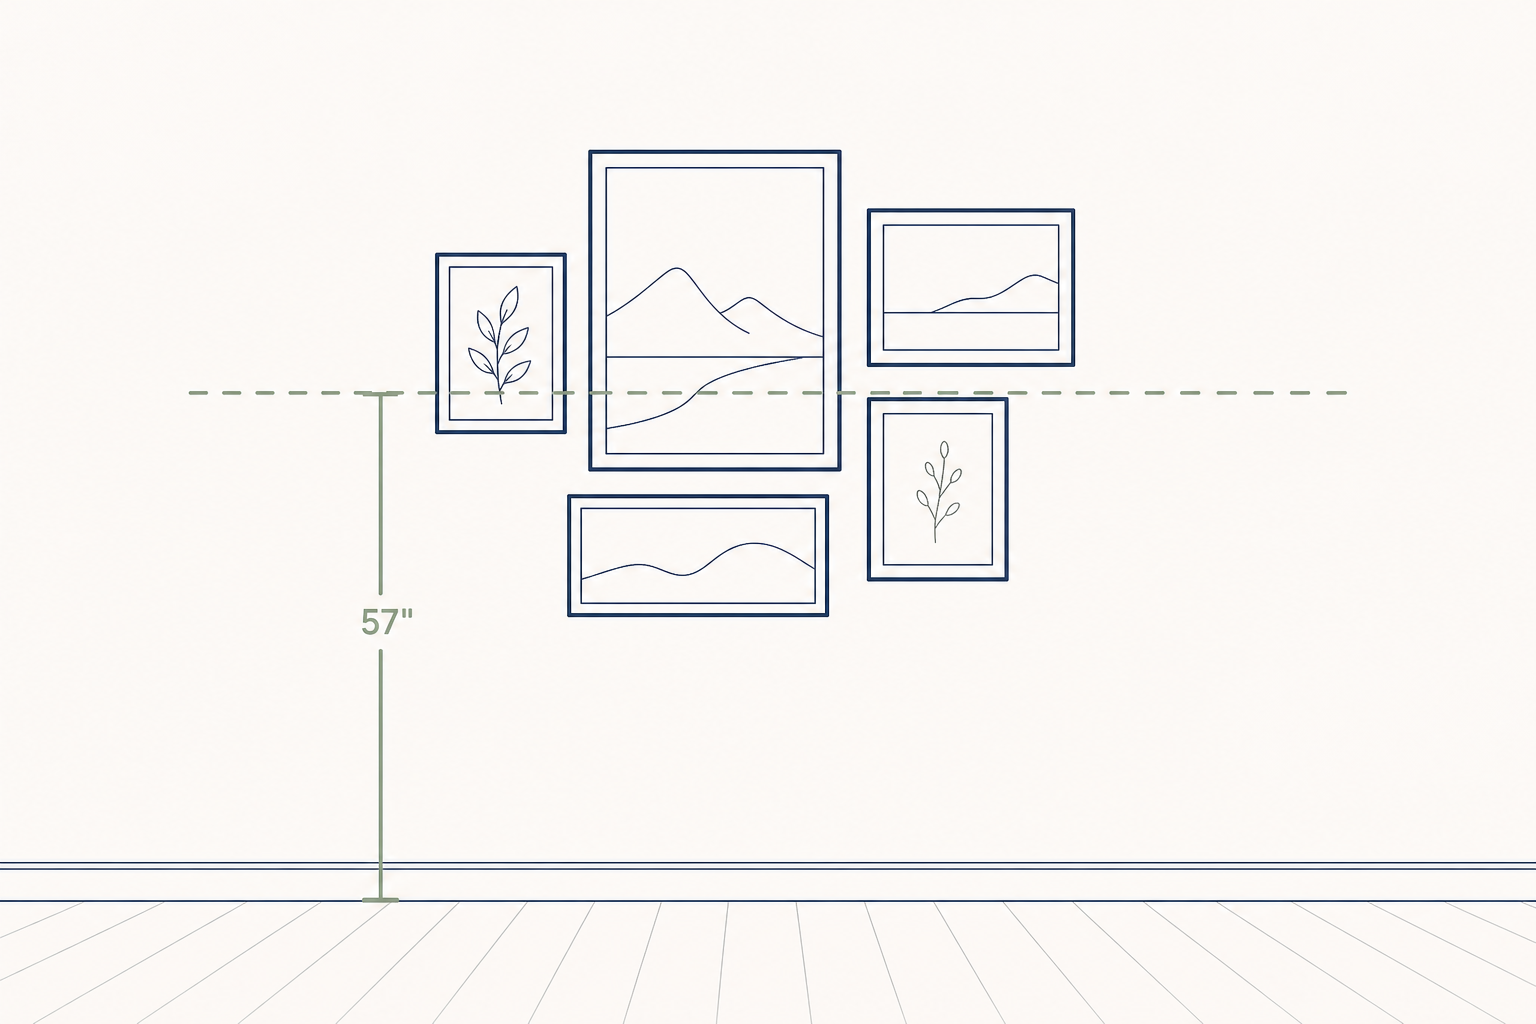
Museums hang art so the center of the piece sits about 57 inches from the floor — average standing eye height. For a gallery wall, apply that number to the optical center of the whole group, not to each frame.
- Measure 57 inches up from the floor and make a light pencil mark.
- Once the templates are up, find the visual middle of the cluster.
- Shift the whole group so that middle sits on the 57-inch line.
The usual mistake is hanging at standing eye height the wrong way: you put the nail where your eyes are, and the frame hangs above that. The 57-inch rule is about the center, not the nail or the top of the frame.
When to break it: art above a sofa
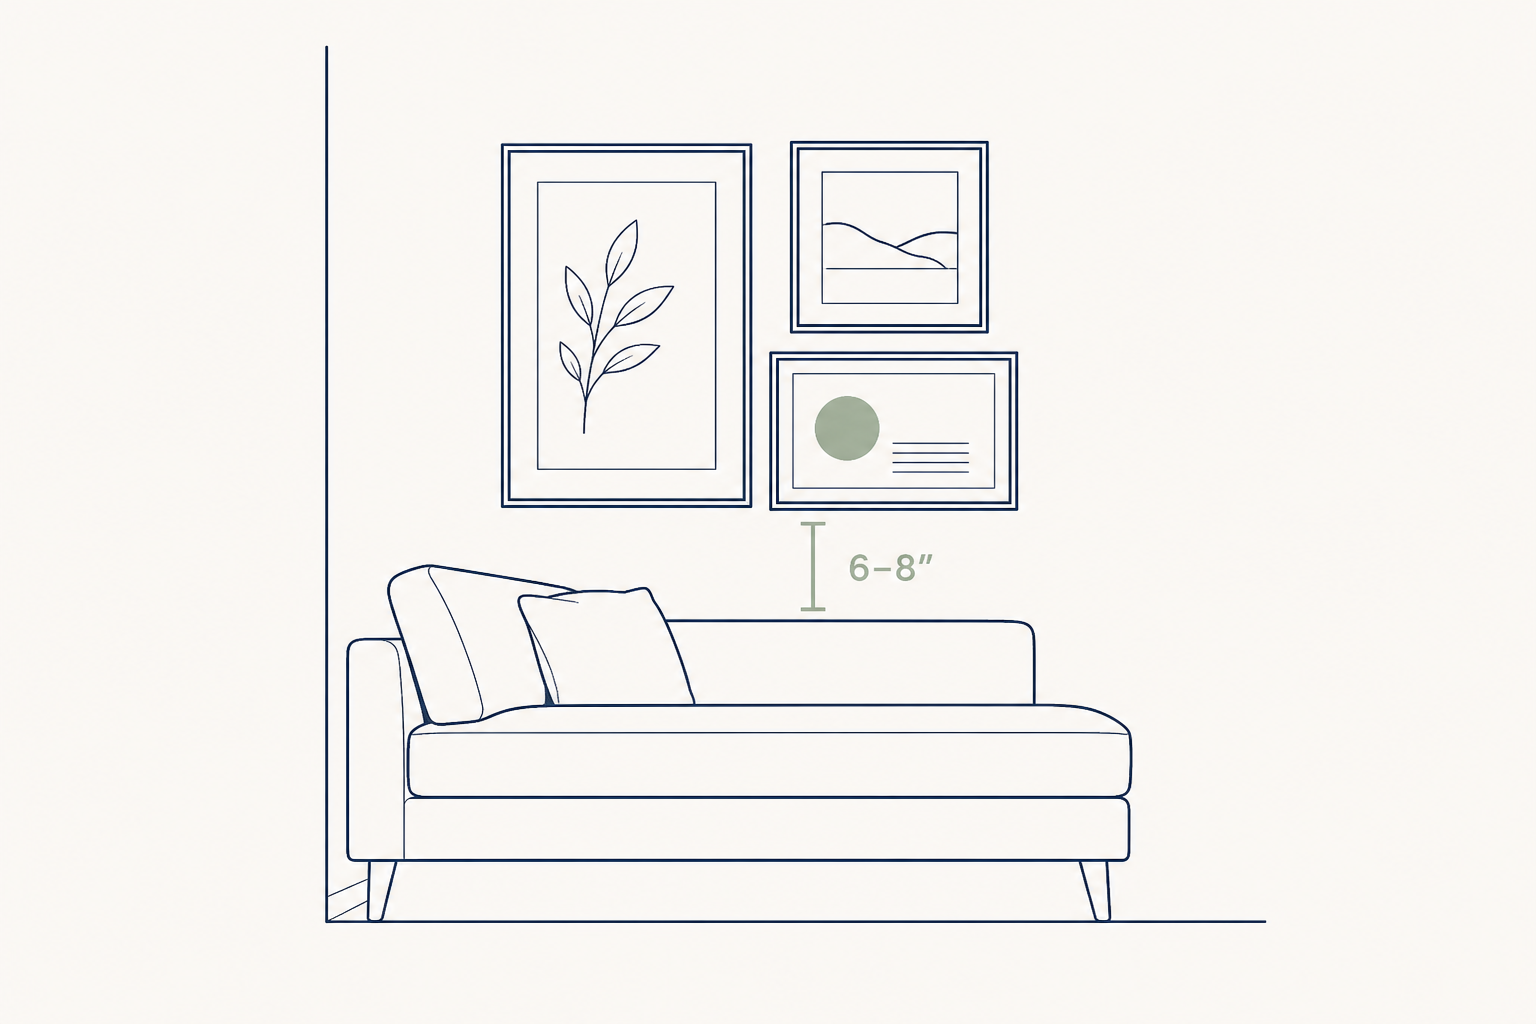
Furniture wins. If the wall sits above a sofa, hang the bottom of the lowest frame 6–8 inches above the sofa back. That gap ties the art to the seating. A bigger gap makes the sofa and the wall feel like two rooms.
On a tall sofa these rules conflict. Keep the 6–8 inch gap and let the center sit higher than 57 inches. The sofa relationship matters more.
Same idea above a console or a headboard: 6–8 inches above the furniture, then 2–3 inch gaps.
Spacing
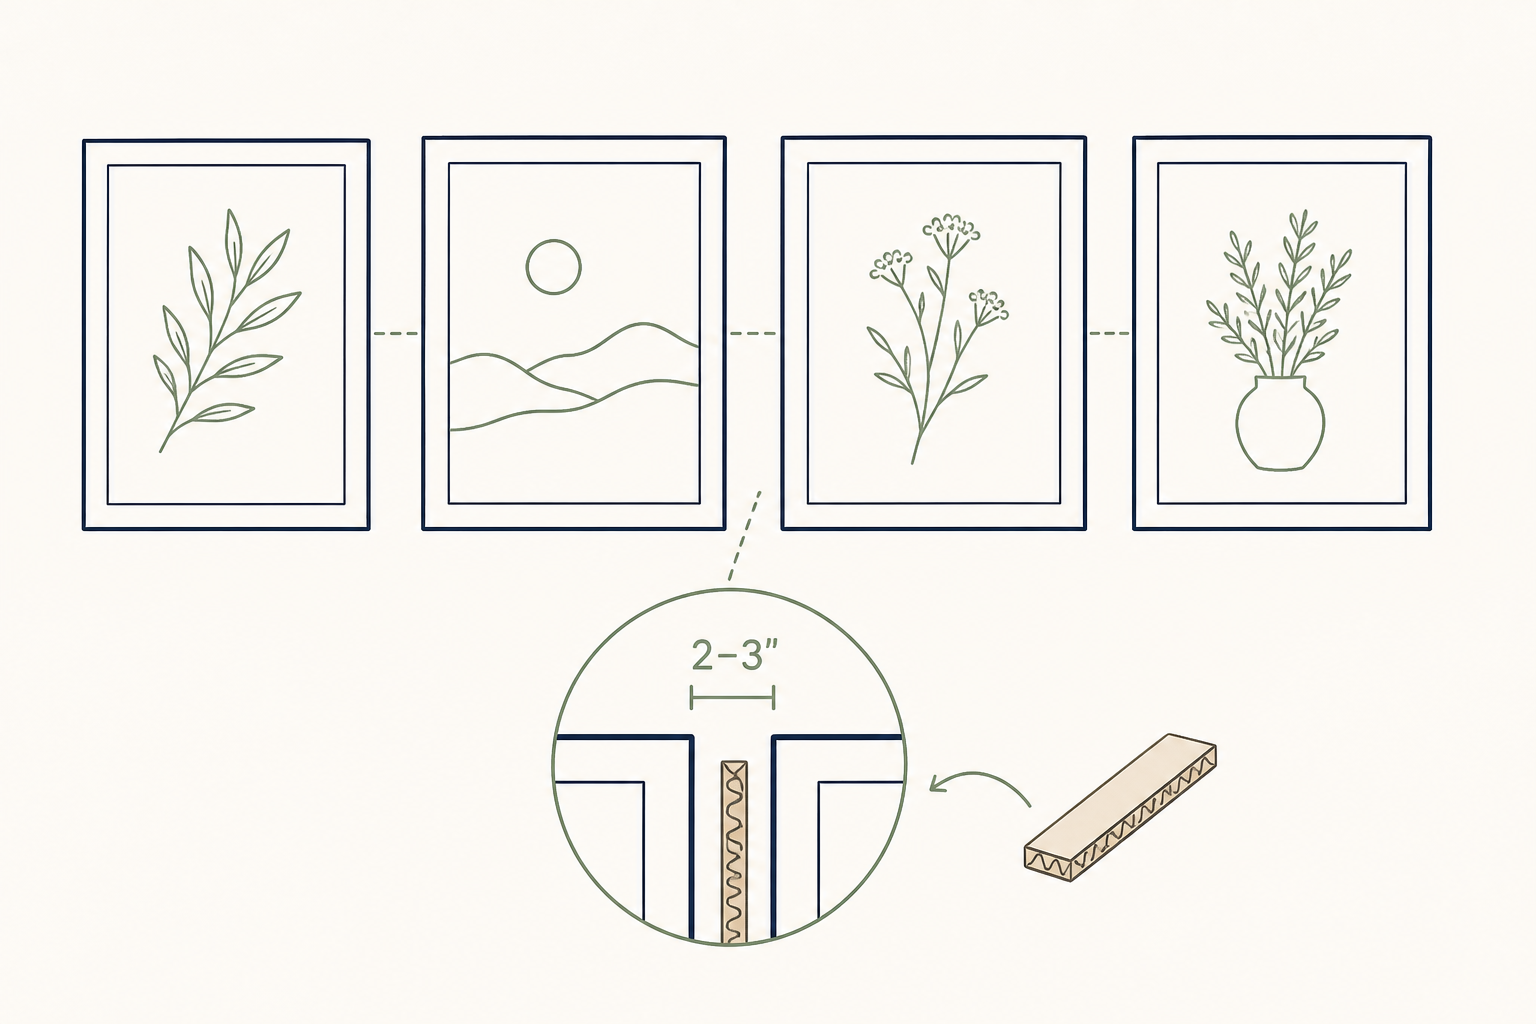
Pick 2 inches or 3 inches and stay there. Cut a cardboard spacer and use it between templates, then frames. Consistent gaps are what make a mixed pile look designed.
Common mistakes (skip these)
- Hanging too high. Nail at eye level, art above it. Empty at sofa height, busy near the ceiling.
- The dentist-office grid. Six identical frames, unrelated prints. A grid is a choice. It needs matching frames and a reason.
- Ignoring weight. Adhesive strips on a heavy frame, or a thin nail in a mirror, is how things fall. That is a safety question, not a style one.
- Skipping the paper. Measuring once, hanging immediately, then patching extra holes.
- Treating every wall like drywall you own. Check the lease, and check for plaster, brick, or hooks you can reuse.
Hang it
Choose a path. Do not mix methods on one heavy piece.
When nails beat Command strips
Use a nail and a rated picture hook when:
- The frame is heavy, or it has glass
- It is a mirror
- It would hurt someone if it fell (above a sofa, a bed, a desk)
- The wall is textured, freshly painted (under a week), or in a steamy bathroom
- You are staying long enough that a small hole is a fair trade for something that stays up
A picture hook (the small hooked plate with an angled nail) holds more than a bare nail and leaves a small hole. That is the default for most real frames.
Nails path
- Confirm the lease allows small nails, or that you have a patch plan.
- Keep the paper templates on the wall.
- At the hanging-point mark on the anchor template, use the level to draw a short light line.
- Hammer the hook or nail into that mark, angled slightly upward if the hook is designed that way. Do not bury the head so deep the frame cannot catch.
- Hang the real frame. Check it with the level. Adjust the hook, not the frame, if it tilts.
- Pull that template down.
- Use the cardboard spacer against the hanging frame to set the next gap, then repeat from the hanging-point mark.
- Work out from the anchor. Recheck level every time.
Studs, drywall, and hooks that are already there
Most framed prints do not need a stud. Drywall plus a rated picture hook is enough for typical 8×10s, 11×14s, and light 16×20s. Find a stud, or use a drywall anchor rated for the load, for a mirror, a heavy wood frame, or anything over the weight on a standard picture hook.
If the last tenant left hooks in useful places, reuse them. One existing hook can carry your anchor. Fewer new holes beat a brand-new layout for its own sake.
When Command wins
Adhesive strips are the right call when:
- The frames are small and light (check the number on the pack; do not guess)
- The paint is smooth, fully cured, and you are not allowed to mark it
- The lease is short and you want the wall untouched
- Nothing in the group is a mirror or a heavy glass frame
They fail on texture, fresh paint, humidity, skipped cure time, and small strips on a medium frame.
Command path
- Check each frame’s weight against the strip rating. One pair, used as directed, is the unit. Do not exceed it.
- Clean the wall and the frame back with isopropyl rubbing alcohol. Let both dry.
- Press the interlocking strips together, then press the pair onto the frame for 30 seconds.
- Press the frame to the wall, on the template mark, for 30 seconds.
- Pull the frame straight off so the wall-side strip stays put. Leave it to set for at least one hour. Skip this and frames drop overnight.
- After the hour, snap the frame back on. Check it with the level.
- Repeat, using the spacer for the 2–3 inch gap. Do not hang the next frame until its wall-side strips have had their hour.
If a strip fails, do not layer a new one over the old adhesive. Remove it, reclean, start over with a fresh pair.
Step back and fix
You will want to be done. Take four extra minutes.
- Stand in the doorway you actually use. Then sit where you sit.
- Look for one frame that drifted high, one gap that opened up, and one piece heavier than its neighbors for no reason.
- Check every frame with the level, not with your sense of the room. Floors lie.
- Fix the one that bothers you. One crooked frame makes the whole wall look unfinished.
- Erase leftover pencil. Pull stray painter’s tape slowly, back on itself.
If the group is clearly too high, take it down and drop it. Patch the old holes now, not the week you move out.
Move-out, and the deposit
A gallery wall is allowed to be a rental project. The deposit conversation goes better when you treated the wall like it was not yours to wreck.
- Keep the before photos.
- Keep leftover paint if the building left you a touch-up can. Put the color name in a bag with the lease.
- At move-out, fill nail holes with lightweight spackle, sand when dry, and touch up. A small hole is a small repair. A cluster of exploratory holes is not.
- To remove adhesive strips, pull the tab slowly, straight down along the wall, not out toward you.
- Do not hide a hole with toothpaste, glue, or pencil. Landlords have seen all of that.
If the lease banned nails and you used them anyway, budget time to return the wall to the before photos. That is the deal you made.
FAQ
How high should I hang a gallery wall? Hang the group so its center sits about 57 inches from the floor. Above a sofa, keep the lowest frame 6–8 inches above the sofa back, even if that moves the center.
How far apart should frames be? Two to three inches, the same gap everywhere. Cut a cardboard spacer and stop eyeballing it.
Can I hang a gallery wall in an apartment without nails? Yes, for small, light frames on smooth, cured paint, with adhesive strips used to their weight rating and given a full hour to set. Use nails or a rated hook for mirrors, heavy frames, and anything that could fall on a person.
Do I need to find a stud? Not for most pictures. Use a stud or a rated drywall anchor for mirrors and heavy frames. Reuse existing picture hooks when they already sit in a useful spot.
What if my lease says no holes? Use adhesive strips on the pieces that qualify, skip the heavy glass, and photograph the wall before and after. If the only safe hang is a nail, that piece may not belong on this wall for this lease.
Why does my gallery wall look messy even though I measured? Usually the group is too high, the gaps are inconsistent, or the frames are the same size and the art does not match. Fix height and spacing first, then edit one piece out.
Shop (what we use)
If you want the hanging tools in one place: TINKR Hanging Kit — $24.99. Claw hammer, compact level, 93-piece set of nails, hooks, and hangers.
If you do not have a tape measure or a screwdriver yet: Home Essential Kit — $29.99. Hammer, screwdriver, wrench, tape measure, Allen keys, canvas roll-up.
The wall is the project. The kit is just the stuff that stays in the closet after.






